A lot of DMMs have a frequency reader that you can use. A frequency generator will also do the trick. Otherwise you can use a tuner. I think I just used my Cleartune tuner app to calibrate it. For example, 660 Hz is E at 5 semitones: http://en.wikipedia.org/wiki/Scientific_pitch_notation
If you’re having problems calibrating because of the emphasis pot, you’ll know that something isn’t right. Regardless you should check all of your solder joints to make sure everything is good.
That could certainly be it. Doing multiple things at once makes this stuff more difficult to track down. Doublecheck the pots solder joints and verify it works correctly with a DMM.
I’ve been looking at a few of these mods, I have a couple of questions and although I’ve wanted to grab hold of a Moog for around 15 years I’ve only recently purchased my MG-1 so please excuse my ignorance.
Firstly, looking through the guide I see the second “minimoog” type filter, how different in sound is it from the default mg-1 filter? I only ask because if there is a particularly different sound would it be possible to wire in a toggle to choose either filter by switching signal path?
Secondly, again excuse my ignorance, if the pitch jack on the back can be connected to an expression pedal and the modulation slider essentially being a mod control, would a modder be able to wire in pitch and mod wheels?
Thirdly, I need to find a full new set of sliders
.. Any help?
Lastly, I’m not only the worst diyer in the world (i take things apart, break them and get angry), I’m also in contention for the place of worlds worst solderer. Is there anyone in the UK that can do these mods? UK based users or stores etc… Help is greatly appreciated
Hi, first of all - thank you Falcon for posting all these tips - they really worked great and I have done almost all of them (and then some extra), and my MG1 has turned out awesome!
There is a few additions, the multi trig-circuit needs to have a 90k at R7 for better multi-triggering.
When doing the LFO → osc2 pitch, it is easy to put in a switch and then tap the ENV-signal from pin7 if the U13 op-amp. Then you get FM on the osc2 from both LFO and ENV.
Then you can use the same set up, but instead of going to the osc2 pitch, you plug it in to the PW’s. Then you get switchable PWM either from LFO or ENV.
There is also a 10k trimpot for adjusting the Cut Off, put this on the panel as well so you can close the filter to zero.
I also did the Minimoog filtermod, you can hear it in the examples I posted above. Alas, I did not do a “before/after” demo, but you can really hear how “meaty” the filter is.
I am not sure exactly how big the difference is from before, but it is definitely not getting any less good with the mod. But to me (after playing with the modded MG1 for a while) the best mods by far is the sustain pot and extra low oscillator octave. And PWM. And FM. And wide KBD TRACK. And… and… and…
I am so glad I found this site! I recently purchased two MG-1’s. Both need some work. I want to mod one, and keep the other stock. For a little history, I am actually a guitarist with a Pro Tools based studio who basically uses soft synths for recording synth parts. I was arranging a cover of Death Cab for Cutie’s “Black Sun” and fell in love with the synth parts. For certain parts, my soft synths just weren’t doing it sonically for me.
I had a brief conversation with Chris Walla and was told that on the choruses he used a MG-1 tied to the ACME SAM-16 sequencer. There’s a sequence running through the whole track that gets muted and unmuted at different points. It’s 15 beats, which is why the theme never falls the same way twice in the choruses. He played the changes along with the sequence in the choruses using the MG-1’s polyphonic oscillator, which is post-gate but not affected by note information. Anyway, that is how my obsession with the MG-1 began.
So far I have had to replace some of the MM5823N IC chips, and reconditioned the sliders on one of the units so for. Th only mod I have done is increasing the audio output level by removing the R102. Next I want to do the Minimoog filter as well as tune Osc 1 & 2 one octave lower mod.
For tuning Osc 1 & 2 one octave lower, I see there is the option to add a switch rather than lowering it internally. I prefer the switch method since it will allow me to switch between lower and the stock higher. Unless I missed it, I did not see the instructions including the switch. Can anyone point me to those instructions, or let me know how it’s done step-by-step? I build my own pedals so I do have experience with soldering the various components as long as I have the instructions. When it comes to reading schematics and figuring things out that way, I am not very good.
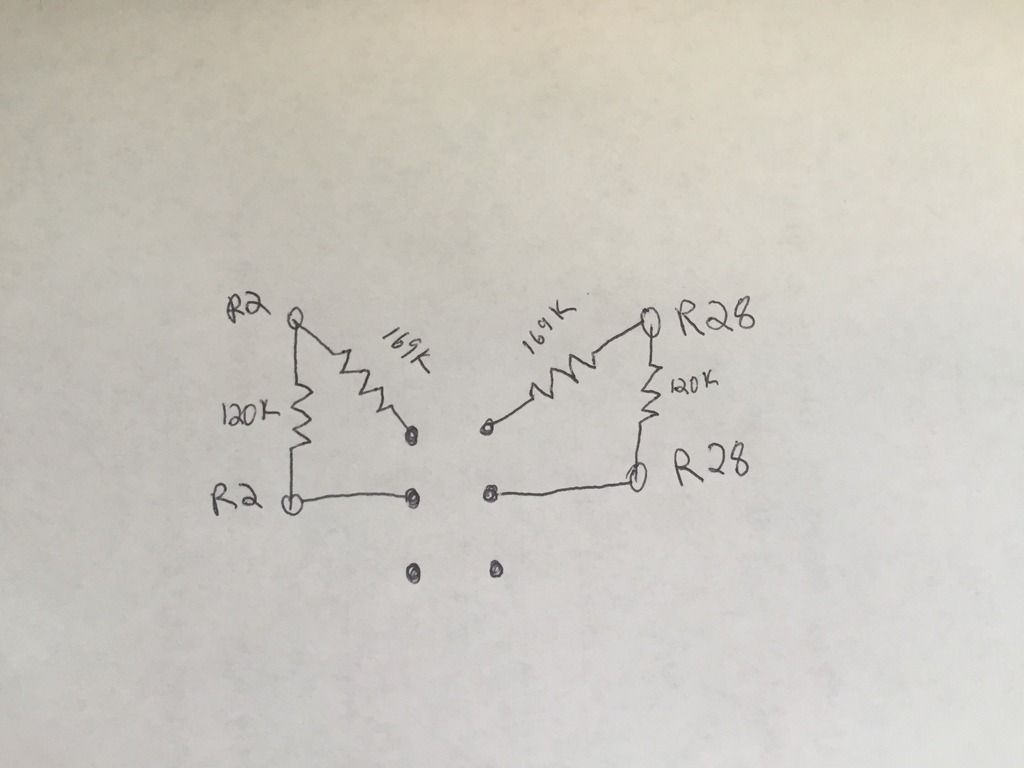
I never ended up putting a switch in mine, so I didn’t draw it up. You could use a dpst or dpdt switch to put 169k resistors in parrallel with the 120k resistors that are there. That would give you 70k when the resistors are in the circuit or back to stock 120k when they are out. Take a shot at drawing out how to layout the switch. Basically, you would connect the poles to one end of the resistors in the board (R2 and R28). One set of throws would be unconnected (for stock 120k), the other sets would have the 169k resistors connecting to the other ends of R2 and R28. Let me know if this makes sense.
Thanks, it does make sense, but i am a visual person and would need to see it drawn out. I am just not a smart as guys like you when it comes to things like this. I am not an electronics technician, but I play one on internet forums
My skills really just amount to DIY projects like pedals, and working on gear with line by line instructions and photos. When it comes to experimenting or troubleshooting, I get lost. I do have a mini dpdt switch so I would probably use that over a dpst.
Here’s a quick drawing. The two 120K resistors are already on the PCB. You just need to add the wires from one side of R28 and R2 to the center poles of the switch. Then wire the 169K resistors from the top pins to the other sides of R28 and R2.
There are some switches that are laid out differently. Now is a good time to learn a little more about what that switch is doing. Take a multimeter and put it on the resistance setting (will be an ohms symbol). Run a continuity test on the pins. Some multimeters have a button you can press to play a sound when there is no resistance between the two probes. You should see when the switch is in one position, the middle two pins connect to the pins on one side. When it’s in the other position, the middle two pins connect to the opposite side. Pretty simple!
Incredible work, and it sounds really great. 3 questions pop into my head:
How did you make such nice panel legending?
What did you use to cut the nice square holes for your slide switches?
What did you mount the slide switches to??
I’m definitely going to take on some of these mods, but I want it to look as great as yours!
Thanks guys! I love my MG1, and as you can see on the faceplate it is now a MOOG for real. I decided on putting the Moog-name bigger. Since it says Moog on the boards anyway. Apparently, the original name-suggestion was “Moog MIDGET” but Realistic decided on MG1.
It is a rugged vinyl printing. Costed me abour €50. Alas I did not realize that some of the pot’s had wider shafts, so it ended up being a bit of a patchwork having to drill larger holes, but you only notice when you look close.
I used a 4 mm drill, made two holes, and then used a fine metal file (bought really thin ones) to file it open between the holes. Again, if you look close it is not perfect, but from an arms distance you won’t notice.
The trickiest part. They are actually all mounted with screw and nut. I used the smallest size I could find, then I filed the head of the screw flat (so it would create a large flat surface) and then I super-glued it to the metal from beneath. Then i attached the switch with the nut. Really tricky but it worked. And - touch wood - they are all still in place.
And as a final twist, I slaughtered an old beat up Kenton ProSolo mk1 and put it inside the right end-cheek. Fitted perfectly, and it is by far the best Midi-CV ever made. So now I have velocity-to-VCF and an extra LFO in my “MOOG MG1” as well.
PS; I’m not normally in favor of modding vintage gear this heavily, but I got my MG1 really cheap with a smashed right end cheek and cracked surface sticker. So it was a mess anyway. And I must say that considering that it is now one of my favorite synth (use it more than my Minimoog actually) it is really worth doing all these mods. To get such a monster synth in such a small format is great!
If everything is done correctly, is recalibration generally never needed when doing the filter mod? I just got my MG1, want to do the filter mod, but I’m having a very hard time understanding that calibration process on p18. I’d hate to do it and be stuck.
You sent a few questions through PMs and in other threads. I’m just going to respond to them here. Just in case other people have the same questions.
There are three main calibration procedures in the manual. Tuning calibrations for all three sound sources (poly, osc 1, osc 2), setting the range of the filter pots (scale, emphasis, and cutoff), and adjusting the final VCA output volume. I would skip the square wave adjustment unless you have an oscilloscope and want it to be perfect. They can be found on pages 17 and 18 of the manual:
You should go through and calibrate the tuning if you are modifying any of the oscillators. In the manual, whenever it says trim next to it, that means its a small internal trim pot. They’re little plastic pots that you use a screwdriver to turn. I think for the oscillators, these trim pots are also reachable from the back through some small holes. For example, to tune oscillator 1, there are three trim pots that the manual tells you to center (Tone Source 1 Freq Trim R1001, Tone Source 1 Scale Trim, R1008, and Tone Source 1 High Freq Trim R1009.)
These steps are important because you want to make sure the tuning range is set correctly. If not, your oscillator will go out of tune every time you switch an octave. Or will be in tune on the lower notes, but out of tune on the high notes. The process is really simple as long as you have a tuner that you can plug it into. Some of the directions tell you the specific tuning octave by specifying the actual hertz. 440hz is A and is generally what the A directly above a middle C on a piano is tuned to. If your tuner doesn’t tell you the exact frequency, you can probably use a app for it on your phone.
The filter tuning is important so that the settings will all react like you expect them to. If you modify the filter, you’ll definitely need to go back and adjust the trim pots. Just follow each step, one at a time, in the manual. Most of the settings are “close enough”. Just to get you in the range so that it will self oscillate correctly.
The filter components are all located on the top board. They are mostly in between the Contour and Master Volume.
Hi there, I know this is an old thread, but do you still have the photos that were hosted on photobucket? I am going through and trying to do the mods, but it would e easier if I had the images you so kindly made/posted too.
This is super exciting, thank you for the time and effort put in.
Thanks,
Eli
Hi, thank you for all the great, useful information!
At the moment i’m trying to build the retrigger mod, but cant get it to work until now. It does strange things here, sometime triggering by itself, sometimes triggering OK and sometimes nothing. The keyed mode is also not working with my mod installed.
I removed it for now - maybe i’ll start again from scratch.
I have one question (maybe this belongs to my problem with the mod): Is it normal for an unmodded MG-1, that in contoured mode (with sustain out) fast note-repetitions and fast playing (non legato) in general is impossible? Slow staccato notes are working, but when playing faster (even short staccato with gaps between the notes) the envelope is not starting again.
Could this be a fault on my MG-1 ?
Maybe there is something wrong with the contour generator or the triggering ?