Midi Murf exploring

Plug in here for info tips and strategies for your Moogerfooger Analog Effects. Connect more than one for plenty of fun!
spin
Posts: 198
Joined: Fri Jun 11, 2010 11:52 am

Midi Murf exploring

Post by spin » Sat Jan 08, 2011 8:17 pm

Hi all!

i ve finally purchased this enigmatic pedal that i want use with a little phatty. It's very cool but a little bit hard to understand all the functions, especially all the midi cc message that murf could receive via midi.
After a while i understand how send midi clock message with cubase to sync murf with cubase internal clock. I don't understand how is possible to send clock divider messages to Murf (page 20 of the manual). For example, if i want send 1/8 note message to murf, what i have to do? On the manual is written for 1/8 note message need "(CC Values 084-089), Clock messages: 12".

Other question: about controlling filter with Note on message, is possible to have a STEP MODE on the whole keyboard and not only on 1 octave? So is possible to play notes and in the same time advance in the filters pattern.

Thank you in advance for any help, it will be very appreciated! :D

EMwhite
Posts: 1649
Joined: Sun Jun 21, 2009 12:22 pm
Location: Middlesex

Re: Midi Murf exploring

Post by EMwhite » Mon Jan 10, 2011 12:42 am

Enigmatic indeed.

With regard to your question about Clock Division (pg. 18/20) the way it works is as follows.

You have two ways to set the clock divider. RATE knob, or via Midi CC #9.

With RATE knob, each of the various dividers (such as Four WH notes down to 1/64th note) are selectable based on position of the knob. As opposed to a gradual analog LFO type pot (when red light is flashing and you're using internal clock), the Midi clock depends on incoming Midi clock (from drum machine or Cubase in your case) plus either the position of the RATE knob (which is graduated across the scale in a somewhat non-specific manner) OR set via CC #9.

As example:

If you send a value of 84 to 89 to CC #9 (it doesn't matter which value), it will set divider to 1/8th note pulsing, and as the manual points out this equates to 12 clock messages; sending values of 65-70 will set it to quarter notes, and so on.

To demonstrate this, I configured my controller (Novation MK II SL) to have one of the buttons send an 85 or 64 and you can clearly hear the clock go double-time. The not so obvious trick is to set the midi channel appropriately because unlike Midi Clock, CC's must be received on he proper channel. Check pg. 16 for this if something other than 1 is desired. The short answer is that you have to set both the LFO and FREQ switches in the left position, yank the power then startup with Foot switch depressed. The midi channel will be set to the # associated with the Pattern Selector 1..12.

I haven't the time to test out you Step Mode question but if you still haven't figured it out let me know and I'll be happy to dive into it and respond.

(hope this info helps)
'76 Minimoog, Taurus 3, Oberheim FVS + Son of 2-voice; Sequential ProOne; Juno 106; Moog Model 15; Kurzweil 250; Hammond M3; and a handful of Fender Basses Flickr!

spin
Posts: 198
Joined: Fri Jun 11, 2010 11:52 am

Re: Midi Murf exploring

Post by spin » Mon Jan 10, 2011 5:33 am

really thanks for your help!! now i got it.i didn't uderstand the CC for clock divider was CC9...thank you! :D

Yep about step mode question i still not have idea, i m just trying to understand how work and what are the differences between step mode, mute mode and triggered mode, to understand better what i can do sending midi out form little phatty to Murf :mrgreen:

EMwhite
Posts: 1649
Joined: Sun Jun 21, 2009 12:22 pm
Location: Middlesex

Re: Midi Murf exploring

Post by EMwhite » Mon Jan 10, 2011 9:25 am

spin wrote:really thanks for your help!! now i got it.i didn't uderstand the CC for clock divider was CC9...thank you! :D

Yep about step mode question i still not have idea, i m just trying to understand how work and what are the differences between step mode, mute mode and triggered mode, to understand better what i can do sending midi out form little phatty to Murf :mrgreen:
Yes, the doc is rather poor in this regard, it's a complex product (the most complex fooger in my opinion) that could use examples.

Will get you an answer to your other question later this evening.
'76 Minimoog, Taurus 3, Oberheim FVS + Son of 2-voice; Sequential ProOne; Juno 106; Moog Model 15; Kurzweil 250; Hammond M3; and a handful of Fender Basses Flickr!

jeepo
Posts: 282
Joined: Fri Jul 31, 2009 11:38 pm

Re: Midi Murf exploring

Post by jeepo » Sat Jan 15, 2011 7:07 pm

spin wrote:really thanks for your help!! now i got it.i didn't uderstand the CC for clock divider was CC9...thank you! :D

Yep about step mode question i still not have idea, i m just trying to understand how work and what are the differences between step mode, mute mode and triggered mode, to understand better what i can do sending midi out form little phatty to Murf :mrgreen:

I don't think step mode works how you want it to, at least not with the current os. You may be able to patch the audio out from your keyboard into the tap/step jack plugged in half way though. (Before the midi murf people used a click or drum track into the step jack for midi sync.)
Stage II, MF-102, MF-105m, MF-107, paia theremin, akai s2000, yamaha pss 680, yamaha cp 25, and other stuff

EMwhite
Posts: 1649
Joined: Sun Jun 21, 2009 12:22 pm
Location: Middlesex

Re: Midi Murf exploring

Post by EMwhite » Sun Jan 16, 2011 12:10 pm

Ah, I didn't realize what you meant until the re-read.

Depending on the synth you are using, you'd need to take the GATE OUT into the Step jack either "1/2 way in" as they say, with a Step adapter from Moog, or with a standard 'insert' cable.

Voyager Old School has a Gate out on the back panel, standard Voyager does not so you'll need a VX-351. Little Phatty can do it but only with CV Out upgrade.

If you have a MP-201 and no synths with GATE OUT, another option is to configure a channel for GATE type, CV only that is triggered by Midi Note On. I haven't tried this but believe it is possible, certainly I've done Midi triggered envelopes and in the worst case, you can do the same and have an Envelop which has 0 Hold/DeLAY, 0 Attack, high Sustaing and a zero to a quick Release (if diff between Note on and Note off is too short; playing staccato) likewise for long playing notes) you might get an unusual/misfiring of gate so you'll need to play with it to see what works.

And yes, as the other Jeepo said, you can (as others have) done this with Volume but the same issue that I mentioned above applies (that being that the length of note and attack/decay might not be shaped right in order to be sensed as a Gate). Certainly a drum hit or consistent LFO output is very good at pushing Filter fwd but you won't get the note by note effect you are after and may as well use built in RATE clock for that.

Btw, the "OS" of the Midi_Murf is not really up for new features, it's more of a PIC type of IC (ie. not a full featured controller with adequate onboard Flash memory) so Moog has not made too many changes to the code and doesn't have room for much more.

Ideally, a primitive of the code that works as part of the step programming mode of the Midi Murf would be best (code change required) because it can sense NOTE ON and, regardless of how long the note is held, it could kick fwd one step.

Tricky world this integration of Midi and control voltage.
'76 Minimoog, Taurus 3, Oberheim FVS + Son of 2-voice; Sequential ProOne; Juno 106; Moog Model 15; Kurzweil 250; Hammond M3; and a handful of Fender Basses Flickr!

spin
Posts: 198
Joined: Fri Jun 11, 2010 11:52 am

Re: Midi Murf exploring

Post by spin » Mon Jan 17, 2011 6:29 pm

really thanks guys!

i don't understand completely what u ve written. I can play my own pattern using a gate out to tap/step input right? but for this i need cv out upgrade of phatty or using a mp-201 configured to transmit gate out cv with midi note on. I don't uderstand about volume out..if i send my audio out to tap/step input, i ll listen nothing because can't send it to audio input?

thanks for your help!

EMwhite
Posts: 1649
Joined: Sun Jun 21, 2009 12:22 pm
Location: Middlesex

Re: Midi Murf exploring

Post by EMwhite » Mon Jan 17, 2011 10:34 pm

It is confusing.

Think of the Midi capabilities in 4 parts.

1. go push new firmware (rarely if ever used)
2. Midi clock input
3. cc input to tweak parameters
4. 'programming' mode in which you can set filter sequences from a Midi kbd vs. using the Pattern editor

While in what I'll call 'use' mode (not programming mode as mentioned in #4 above), the Step input jack on the Murf can certainly be (as you've already done) used to step through each step in a pattern sequence regardless of clock (ie. clock is stopped and Murf is waiting on next step).

But I think what you asked above is whether or not you can have the pattern advanced 1 step with each Midi key played and I don't think this is a base capability of the product but you can do it by using an external device (like the Multipedal) to convert from Midi to Gate (if you don't have CV out on your Phatty), or, you can do as many have (and have been doing) by using an audio connection to drive enough voltage to the Step input jack so that the Murf thinks it's getting a gate signal.

Yes, I went on and on above about the dynamics of the envelope of the sound and it does get confusing but if you tweak it enough, you can surely get this to work in most scenarios, just experiment. As a word of caution, a normal audible level tone which is moderate in loudness will be fine going into the MuRF but certainly do NOT send in a hot amplified signal like that which comes out of a Guitar or Bass amp.
'76 Minimoog, Taurus 3, Oberheim FVS + Son of 2-voice; Sequential ProOne; Juno 106; Moog Model 15; Kurzweil 250; Hammond M3; and a handful of Fender Basses Flickr!

spin
Posts: 198
Joined: Fri Jun 11, 2010 11:52 am

Re: Midi Murf exploring

Post by spin » Sat Jan 22, 2011 8:35 am

thanks again!

actually i don't have the cv out mod on phatty, so i can't send gate signal. Probably i ll use an mp-201 in the future to do this^^ I don't understand about the step jack, is this a special jack or a normal one? Can i found it at any music shop or need moog one to get it works?

ps: sry i am a little bit retarded-.- I don't understand the setup to make it works through volume. I have to send phatty out to step input and then?

thanks for any help!

EMwhite
Posts: 1649
Joined: Sun Jun 21, 2009 12:22 pm
Location: Middlesex

Re: Midi Murf exploring

Post by EMwhite » Sat Jan 22, 2011 4:53 pm

spin wrote:I don't understand the setup to make it works through volume. I have to send phatty out to step input and then?

thanks for any help!
Yes. You'll need to:

a) split the signal such that you are sending the audio from your Phatty into the MurF as you do today; and then send 2nd audio cable into the Tap/Step jack. If you don't have mixing equipment or Mults, etc., a simply 'Y' connector will work but best to have a separate volume control or use an attenuator as discussed below on the signal that goes into the Tap/Step jack.

Remember it needs to go across the correct lead of a TRS (tip-ring-sleeve aka Stereo) plug. and then

b) you'll need to adjust the volume of the Tap/Step lead and possibly the waveform/timbre of the sound so that the MurF thinks it's hearing a CV style GATE which is a sharp square pulse that rises quickly in voltage, usually from 0 to 5V or just above then drops quickly.

About the difference between Tap and Step:

Moog designed this jack input to be dual function (this has been written about by myself and others on this forum but to keep you from running around, here it is again...); the first function, "Tap" is a Tap tempo feature and a typical TS (tip sleeve) plug like those used for audio from your LP to a mixing board or amp will work. The MurF uses this to set tempo of the RATE clock by listening for a few steps (I forget if it's 2 or 3). This can be a simple switch or a GATE but a simple switch for this function is what is typically used and most 'sustain' type pedals that you can get at Guitar Center for electric piano's work well. Moog also has the FS-1: http://www.moogmusic.com/accessories/?s ... t_id=21191

The other function of the input is the Step function which you are interested in and this needs to be wired to the RS (ring sleeve) portion of the TRS (stereo) cable. Once the MurF sees a proper signal across this connector pair, it will stop the RATE clock and not advance the pattern until you Step again.

Cable wise, three ways to do this:

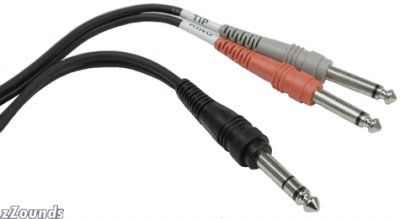
1) use an "Insert" cable which are typically used with midrange to high end mixing boards. They allow an effect like a guitar pedal or rack mounted reverb, etc. (or MoogerFooger) to be placed in-line with the signal through a single cable. It has a Stereo (or TRS) jack on one end and two normal audio TS (mono) on the other; the first of which is wired to TS on the stereo jack and the 2nd which is wired to RS of the stereo jack. There is usually a label on the cable that says "tip" and "ring".

2) buy the Moog Step Adapter which you can find on the accessories page. It's a 2" or so adapter that essentially converts from standard mono to the proper lead on the TRS input. Look here: http://www.moogmusic.com/accessories/?s ... t_id=21205

3) Make your own cable by cutting off the end of a normal mono cable and soldering a stereo jack (from Radio Shack or wherever).

A few pointers pertaining to the incoming Tap/Step signal:

- once you have the proper cable, you'll want to adjust the volume of the signal going into the Tap/Step jack slowly from low volume until the MuRF reacts to the gate. Definitely start with a very basic sound so that you are sure that the shape of the sound is suitable. Attack 0, Decay 0, Sustain 10, Release 0 for Vol and Filter envelope will do it. The waveform of the actual OSC doesn't matter and shouldn't be confused with the shape of the sound envelope.

- be sure that the signal is not too 'hot' to begin with, don't have the gain up from a mic preamp circuit. You want this to be a line level signal, NOT amplified through a 600 watt bass head : ) else, damage to your MuRF will result.

Once you have the basics working, tweak the Phatty sound to suit your needs or pick a patch that you like; you may find that it is not appropriate to cause the MurF to step (Envelope too smooth or timbre too soft, etc.)

Hope this further explanation helps.
'76 Minimoog, Taurus 3, Oberheim FVS + Son of 2-voice; Sequential ProOne; Juno 106; Moog Model 15; Kurzweil 250; Hammond M3; and a handful of Fender Basses Flickr!

c7sus
Posts: 468
Joined: Sun Aug 14, 2005 5:42 pm

Re: Midi Murf exploring

Post by c7sus » Sat Jan 22, 2011 11:24 pm

Would that setup work using one of the mono leads of an insert cable inserted halfway into the step jack without the adapter???
Voyager EB #165, T3 #292, MF-101, 102, 103, 104SD, 2x10⁴MSD, 105M, 107, 108M, MP-201, VX-351, CP-251, Frostwave Fat Controller.

EMwhite
Posts: 1649
Joined: Sun Jun 21, 2009 12:22 pm
Location: Middlesex

Re: Midi Murf exploring

Post by EMwhite » Sun Jan 23, 2011 1:29 am

c7sus wrote:Would that setup work using one of the mono leads of an insert cable inserted halfway into the step jack without the adapter???
Absolutely would (where are my manners). It's a bit dodgy but yes, that work also.

Take a normal 1/4" mono and insert slowly until the light on MuRF turns from red (internal clock) to green. At that point a proper gate signal or a foot switch will make a step. Mechanically what is happening is the ring contact is making a connection with the tip of the 1/4" mono cable;
'76 Minimoog, Taurus 3, Oberheim FVS + Son of 2-voice; Sequential ProOne; Juno 106; Moog Model 15; Kurzweil 250; Hammond M3; and a handful of Fender Basses Flickr!

seank
Posts: 119
Joined: Sun Nov 01, 2009 4:41 pm

Re: Midi Murf exploring

Post by seank » Sun Jan 23, 2011 1:10 pm

is there any way to make a diy step adaptor so i don't have to hack up a cable or pay $50 to get one from moog?

User avatar
latigid on
Posts: 1579
Joined: Mon Jan 30, 2006 3:47 pm
Location: Auckland, New Zealand

Re: Midi Murf exploring

Post by latigid on » Sun Jan 23, 2011 10:22 pm

seank wrote:is there any way to make a diy step adaptor so i don't have to hack up a cable or pay $50 to get one from moog?
http://www.zzounds.com/item--HOSSTP20


Image


http://www.maplin.co.uk/two-1-4-mono-so ... plug-44080


Image

SteveD
Posts: 99
Joined: Wed Jul 23, 2003 9:48 am
Contact:

Re: Midi Murf exploring

Post by SteveD » Mon Jan 24, 2011 10:29 am

Hi All -

Not sure if you'll find this useful, but you can also use MIDI Note# 108 to advance the patterns step by step. It acts just like the Step input. This would be the highest "C" on an 88-key MIDI controller. Most controllers offer enough octave transpose range to get there...

That's on p.21 of the manual - in the section on using MIDI Notes to control the MuRF.

Also on the MIDI MuRF - the jack style is different from the original MuRF - so plugging in halfway to the Tap/Step input is not "dodgy". This eliminates the need for an adaptor if you try it and feel it's robust enough for you.

Hope this helps!

SD

Post Reply